Planning Assistance
We offer the services of trained implantology surgeons to assist with case planning.
For a fee, one of our clinical advisors will review the patient data and suggest a proposed treatment plan, including a suggested surgical guide design and drilling sequence.
Our Clinical Advisors
Each of our clinicians has many years of dental practice experience, placing implants and restorative dentistry.
-
 Dr. Joe Mehranfar Clinical Advisor
Dr. Joe Mehranfar graduated from the Temple University School of Dental Medicine in Philadelphia, and received his Masters in Microbiology from Southern Illinois University. He is acknowledged as an expert in dental implants, and has completed advanced coursework and training in dental implantology. Over the course of the last seven years, Dr. Mehranfar has placed more than 1,000 implants, and he stays at the forefront of implant science by regularly taking continuing education courses in the field.
Dr. Mehranfar remains active in professional groups, serving as Secretary of the Implant Division of the American Dental Education Association. He also holds a Mastership from the American Academy of Implant Prosthodontics (for which he serves as the local Arizona director), and he is an adjunct faculty member at the Midwestern University, College of Dental Medicine, in Glendale, Arizona.
-
Dr. Daniel Haghighi Clinical Advisor
Dr. Daniel Haghighi graduated in 1990 from the Case Western Reserve University School of Dentistry in Cleveland, Ohio. He completed a one-year general practice residency program at the University of Rochester Medical Center in Rochester, New York. He then returned to Cleveland to attend a two-year fellowship in geriatric dentistry at University Hospitals of Cleveland. He is the past department chair of surgery at St. John’s Medical Center in Longview, Washington, and a Fellow of the International Congress of Oral Implantologists.
Dr. Haghighi has lectured extensively on topics related to both the surgical and prosthetic management of dental implant patients, and has broad experience managing medically complex cases. He is an affiliate instructor at the University of Washington School of Dentistry, and holds several patents relating to dental implant spacing devices.
PROSTHETICALLY-DRIVEN CASE PLANNING
Our clinicians use a “Prosthetically-Driven” approach to case planning. This means that they begin their analysis of the treatment plan by first determining the optimal restoration for the missing tooth or teeth. The aesthetics and function of the final restoration is significantly affected by the placement of the implant. Even minor changes in implant placement or angulation can create substantial problems for a successful restoration.
Any treatment plan or surgical guide design proposed by one of Scan Implant Guide’s clinicians is only a suggestion, and the treating dentist remains completely and solely responsible for the diagnosis, prognosis and course of treatment for the patient.
Please see “Terms of Use/Limitation of Liability”.
When you request treatment planning assistance, you will be asked to provide additional information about the patient, including:
- Final prosthetic plan for the restoration
- Photo of the adjacent teeth and their gingival margins to determine the planned gingival margin of the final crown
- Patient’s gingival biotype
- Smiling photo of patient for restorations in the aesthetic zone
- Full mouth impression (even if only working on the mandible)
- Full scan, with bite registration and photos without wax up
- Photo of (and the occlusion for) the surgical site
- For edentulous cases, a scan of the arches with the dentures in place
For further details CALL TOLL FREE at (855) 373-1614 or


Plan the Surgery – Click on the Tabs below for a detailed explanation of each process.
- Step 1 - Scan the Patient
- Step 2 - Scan the Model
- Step 3 - Plan the Surgery
- Step 4 - Print the Guide
- Step 5 - Place the Implants
Scan the Patient
The scanning protocol to be followed will depend on the condition of the patient’s mouth and whether the patient has previous dental work (like fillings or crowns) that contain metal components. For most patients who still have most of their teeth, a CT scan of the patient and a digital scan of the stone model of the patient’s arch will be sufficient. For patients who are fully or mostly edentulous, or patients who have dental work with metal components, it will be necessary to create a radiographic guide for the patient to wear during scanning. Metal-containing dental work near an implant placement site can cause “scatter” in the CT scan that distorts the patient’s CT image. By scanning with a properly fitted radiographic guide, the Scan Implant Guide Planning Software can correct for the “scatter.”
For Partially Edentulous Patients:
- The treating doctor performs initial physical examination of the patient and takes an impression of both arches
(if necessary) to create stone models. - The patient is sent to a radiology center for a Cone Beam CT scan, without any radiologic template. (Please see Scan Implant Guide publication “Cone Beam CT Scan and Optical Scan of Stone Model Protocol.”)
For Fully or Mostly Edentulous Patients and Patients with Metal Fillings or Crowns Near the Implant Site:
- The treating doctor performs initial physical examination of the patient and takes an impression of both arches (if necessary) to create stone models.
- The stone model of the patient’s arch is sent to a dental lab to fabricate a radiographic guide, using a wax-up of the proposed restoration.
- In the alternative, the patient’s denture may also be used as a radiographic guide if it meets the following criteria:
- Teeth are the proper size, shape and length;
- Well-established occlusion;
- Buccal flanges are wide enough for gutta-percha markers and retentive pins;
- Includes hard reline only;
- Has a secure and close fit to soft tissue; and
- Contains no radio-opaque or metal materials.
- The radiographic guide is sent to the treating doctor, who checks the guide to confirm a tight, gap-free fit in the patient’s mouth.
- The patient is sent to a radiology center for a Cone Beam CT scan, while wearing the radiographic guide, and then the guide is scanned separately. (Please see Scan Implant Guide publication “Dual Cone Beam CT Scan With Radiographic Guide Or Denture Protocol.”)
Scan the Model:
For Partially Edentulous Patients:
- The stone model of the patient’s arch is sent to Scan Implant Guide to be scanned by a 3D scanner. In the alternative, an intraoral surface scan of the patient is taken. These scans supplement the imaging sequence of the patient CT scan, and allow the generation of a high- resolution portable STL file of the patient’s intraoral anatomy.
For Fully or Mostly Edentulous Patients and Patients with Metal Fillings or Crowns Near the Implant Site:
- Not Required.
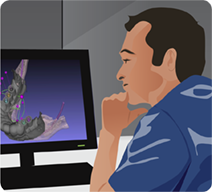
Plan the Surgery
- The DICOM data from the CT scan and the STL file of the model arch (or the DICOM data from the two CT scans, if using a radiographic guide) are uploaded to the Scan Implant Guide Planning Software and our technician digitally aligns them to create a 3D virtual model of the patient’s jaw.
- Using functions in the planning software, the Scan Implant Guide technician will trace and highlight the path of the inferior alveolar nerve through the 3-dimensional virtual model to assist in safe implant placement planning.
- The virtual model of the patient’s jaw created using the Planning Software is used to plan the placement of each of the implants in three dimensions.
- After selecting the appropriate implant and surgical kit from the software library, the clinician can plan the position, depth and angle of each implant to be placed during the surgery.
- Once the implants have all been positioned, the clinician will complete the treatment plan and the software will run an error analysis to make sure implant placement does not impinge any adjoining teeth, implants, nerve or other structures.
- After any such errors are corrected, the treatment plan is finalized by the clinician and uploaded to Scan Implant Guide to complete the design of the surgical guide.
Print the Guide
- Once the planning phase is finished and the treatment plan has been finalized and approved, that treatment plan is uploaded to the Scan Implant Guide server, and the data is converted into an STL file for fabrication of the guide.
- A Scan Implant Guide technician will access the STL file and confirm that the treating doctor has given final approval of the treatment plan and surgical guide design.
- Once final approval is confirmed, the technician will send the surgical guide STL file to a state-of-the-art 3-D printer for fabrication of the guide in a photopolymer resin approved for biomedical applications. Fabrication is completely automated and does not require any intervention by the technician.
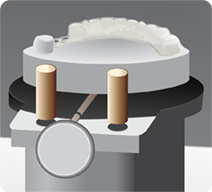
- Once fabrication is complete, titanium drill sleeves are inserted into the guide, and it is boxed and shipped (non-sterile) to the doctor for surgery.
Place the Implants
- Prior to implant surgery, the treating doctor visually inspects the surgical guide to confirm that it conforms to the doctor’s approved guide design and treatment plan, and also checks the guide to confirm a tight, gap-free fit in the patient’s mouth.
- After anesthesia and soft tissue punch, the osteotomy is created by drilling through the titanium sleeves in the surgical guide with a pre-planned sequence of drills, terminating with the drill of the proper diameter and depth to accommodate the insertion of the designated implant size. Each drill size in the sequence corresponds with a key in the surgical kit that fits into the titanium sleeve, and guides the angle and depth of the drill’s progress as prescribed in the treatment plan.
- A flapless approach is only recommended if the local bone anatomy is adequate in volume, and if a wide band of keratinized mucosa is present at the implant site.
- Implant insertion can usually be made directly through the drill sleeve in the surgical guide.